Led strip lights generally need a transformer to supply them with power. In this section we will go through how to connect a LED strip light to a transformer.
Led strip light markings
Let’s take a few examples from the pasting, which will add a suitable level of understanding. Connecting low voltage 12V/24V is easy with monochrome (white) LED strip lights.
Find the markings on the LED strip where you can see the + and – / GND / Ground. The markings are always at the cut-off points.
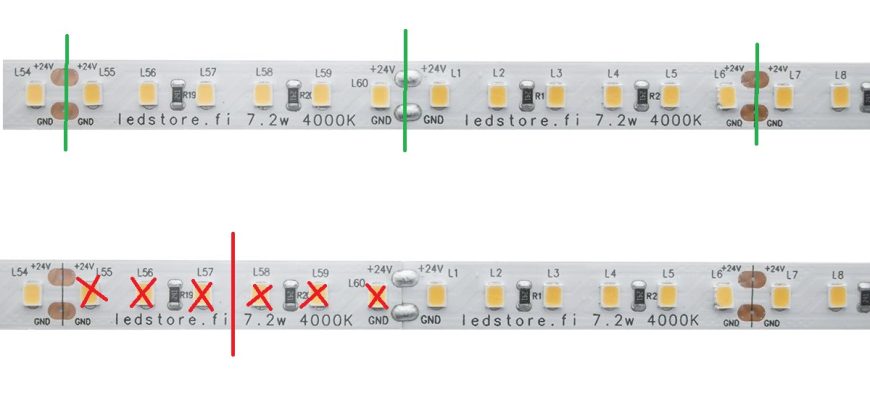
Typically + is red and – is black, but sometimes they can also be white wires both, but one has a line on it to separate them. Sometimes the led strip may also have brown (+) and blue (-)
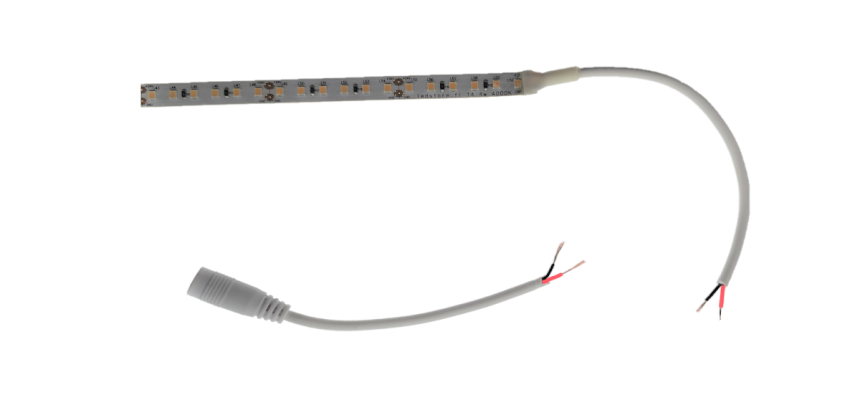
If the LED strip light has a typical 5.5 mm DC connector (barrel plug), the middle of the connector is + and the outer edge is -.
Connecting the LED strip light to the power supply
Always remember to open the entire coil or reel before connecting it to the transformer and powering the strip light. This prevents the tape from overheating and possible damage even for a short period of time. Connecting a standard low-current LED strip light to a power supply is easy. Simply locate the + and – markings and connect the wires to the LED + and LED – positions on the transformer. If the transformer has a power cord and plug ready, it can be easily and safely plugged in by the consumer. If the transformer does not have a ready-made plug at the mains power end, the connection to the mains power supply is done by the installer. The 230V mains power strip also includes a ready-made plug-in lead for safe connection to the plug. This type of ribbon does not have a separate transformer/power supply. 230V installations and modifications to 230V ribbon are electrical work and require adequate qualifications.
Connecting the ribbon to a transformer with a 5.5 mm DC round connector
If the LED strip light has a similar connector, just plug them into each other (male-female). If the LED strip light has only two wires, either one is needed to connect the LED strip light:
- Screw-in DC connector MALE or
- Cut the led driver connector and strip the wires bare. Cutting the led driver connector reveals the same colours as we went through above. The wires are connected to the strip with lever connectors, apico or sugar cane.

Plug the transformer into the wall and the lights will come on. Do not keep the LED strip on while it is on the roll, as it will easily overheat, causing e.g. shortening of the lifetime or melting of the fixing tape.
Connection to IP21 transformer with screw or quick connectors
The mains power is connected to the transformer by means of a plug-in cable connected to the L and N terminals. Connecting the Led strip to the transformer’s low current end is done by reading the markings on the transformer head, which should show the + and – terminal positions. Under the transformer cover you may find, for example, push-in or screw terminals:
- Using your thumb or a screwdriver, press down on the quick connector to open the connector and push the wire into place. The wires lock when you release the connector.
- Unscrew the connectors, put the stripped wires in place and tighten the screws (picture below).
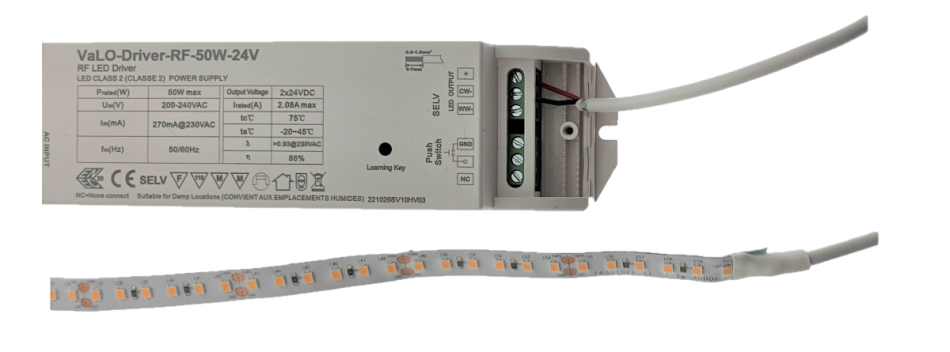
Test that the wires are tight by tugging on them. Insert the plug into the wall and the lights will come on.
Connecting CCT strip to LED transformer
These transformers almost always have screw or quick connectors, but the CCT (colour temperature controlled) LED strip has three (3) wires:
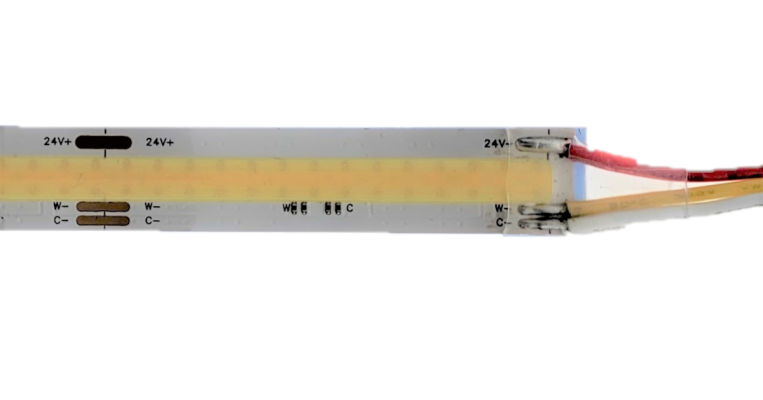
+, warm (WW) and cold (CW)
To connect the strip, read the markings on the led driver, which should show the + and WW and CW terminals. Sometimes WW and CW are marked -1 and -2.
- The most important thing is to connect the + or plus wire in the right place.
- If WW and CW go to the wrong terminals, i.e. warm to cold and vice versa, it is not dangerous. The only drawback is that the light adjustment does not work properly from the controller. If you notice a problem with the adjustment, just change the position of the two (WW and CW) wires.

Again, test that the wires at the low-current end are properly in place by pulling on them. Plug into the wall and the lights should come on.
Connecting an RGB+W led strip to a transformer
These transformers also almost always have screw or quick connectors, at the low-current end. When connecting to the mains, the instruction is still the same, either to have a ready-made plug in the wall or have the installer do a fixed installation. So at this point the LED strip has 4 or 5 wires, with a colour adjustable LED strip in hand. 4 wires means RGB without white light, and 5 wires means that the LED strip has RGB+W, i.e. a separate white light. Below are the most commonly used wire colours, with black being a plus and the others being a minus.
- + = black
- R(ed) = red
- G(reen) = green
- B(read) = blue
- W(hite) = white
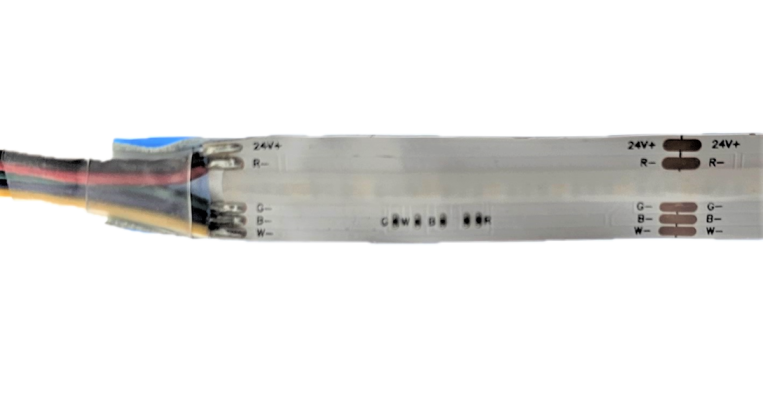
To connect the tape, read the markings on the led driver, which should show + and R, G, B, W. Sometimes they are marked -1,-2,-3 and -4 in the same order.
- + the most important thing is to connect the wire to the right socket
- If the colours go to the wrong connectors, i.e. red lights up e.g. green, just change the positions of the coloured wires. The tape won’t break if it’s connected incorrectly, but if the positive and negative wires are wrong, it won’t light.
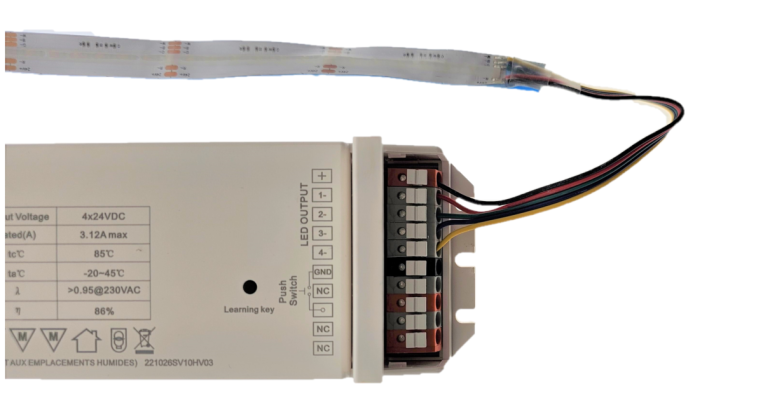
Test again by tugging to make sure the wires are properly in place. Plug the plug into the wall and the lights will come on. A dedicated controller is needed to dim and colour adjust the RGB strip.
LED transformer + control unit (RGB or CCT)
In these cases, the transformer is connected directly to the INPUT + and – terminals of the control device and the LED strip light OUTPUT RGBW or CCT to their respective terminals.
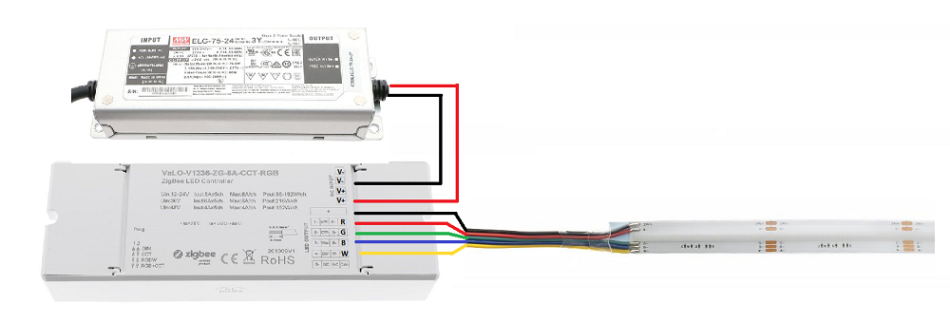
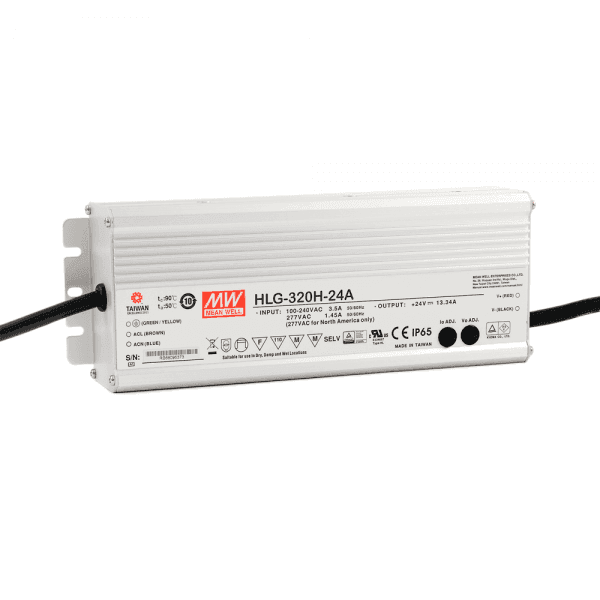
IP65 LED transformer connection with only wires without connectors
These transformers are intended for fixed mains installation which is electrical work. They are clearly labelled and must be followed to ensure safe installation. The low-current installation of the LED strip can be done by the consumer himself, as long as he can afford the connectors. However, for waterproof (IP65) installations, more care is needed than usual, so the installer should take responsibility for connecting both ends and waterproofing any connections.
LED strip lighting use and maintenance
LED strip lighting is very easy to use and offers a wide range of lighting solutions. Maintenance mainly involves cleaning the tape from dust and dirt. It is important to remember that LED strip lighting should not be wetted unless it is specifically designed for damp locations. The LED strip should always be mounted on an aluminium profile unless it is a NEON strip.
Led strip light installation guides
- 12Parallel connection of a Led strip light – We will discuss the principle of parallel connection and give an example.
- 12Led strip light cut-off – Led strip light cut-off and led strip light replacement
- 12Led strip light does not light – Why does led strip light not light, we go through the reasons
- 12Led strip light flashing – Why does a led strip light flash? There are many reasons and we will go through them all.
- 12Led strip light lifetime – What affects lifetime and why do other strips last longer?
- 12Led strip light mounting – How do I mount a led strip light indoors or outdoors? What needs to be taken into account?
- 12RGB Led strip light connection – How do I connect an RGB led strip light to different control devices?
- 12Led strip light extension – How do I solder the joints? A little soldering guide for the beginner.
Led strip lighting specialist
LedStore has been an expert in LED lighting and lighting design since 2010. We have our own product design, so our products are technologically state-of-the-art. Products have quarantee for up to 7 years. We also carry out lighting maintenance.
We focus on temperature-controlled and high colour rendering lights, so they work brilliantly and last a long time. We do around 500 lighting designs for our clients’ sites in a year. Read more here or order a design. Did you know?
LedStore offers lighting design from 169 euros for the whole house!
Made to measure Led strip lights
We offer a service of custom-made led strips, i.e. custom-made led strips in aluminium profile. Also installed.
Remember that we are always ready to offer our help to you along the way, by email (myynti@ledstore.fi) and by phone (045 251 4510). Feel free to share photos of your own projects on social media at #ledstorefi IG and ledstore.fi FB. We love to see the cool things our LEDs do, and it helps to provide inspiration for those who are not sure about the power and awesomeness of LEDs.
Did you know that we already have over 3 500 pictures of our LED installations in our Gallery!

